Here you can find various technical recommendations concerning the use of Super8 loops.
Topics you find below:
General remark on using Super8 film for loops
Film base
Splices
Using the small Eumig Super8 projectors for looping
Projectors ideal for looping
A possible workaround for weak projectors
Using the magnetic sound track to play loops with sound
Using the antistatic brush
The „Back Loop“
General remark on using Super8 film for loops
:
No matter what looper or projector you use, loop projection will result in abrasion and damage of the print when used over many hours. Making copies of your work first is recommandable in any case.
Film base:
Most reversal Super8 film is made of acetate film stock: Acetate is not as durable as polyester film stock which is used for making 16mm prints for instance. Usually camera originals (negative or reversal) are made of acetate film stock. Modern prints made from negatives are made of polyester film stock. To receive a Super8 print in polyester you need to film on negative film and strike a print or when filming with reversal you need to make a blowup to 16mm and then a reduction print onto Super8. These services are provided by Andec filmlab in Berlin (www.andecfilm.de).
Splices:
The film to be looped should have as few splices as possible as they are literally the weak link in the system. Ideally there should be just a single splice: the one which joins the beginning and the end of the film.
The splice ca be made wet or dry, but make sure it is well done! When a bad splice runs through the projector repeatedly the perforation at the splice will get more and more damaged and the might tear or the image might start to „shake“ every time the splice runs through.
Using the small Eumig Super8 projectors for looping:
I have been using Eumig 614D projectors and equivalent models for loops. When using these projectors with short loops (15 – 30s) without any looper system and using reversal originals (acetate film) it resulted in damage to the perforation. The loops can run fine for a long time, but the perf holes become heavily worn out until it is even visible in the projection (the enlarged perf holes protruding in from the side!). As in these projectors the whole film movement of the loop is achieved purely by the transport claw there is an increasing force on the perf holes with increased length of the loop.
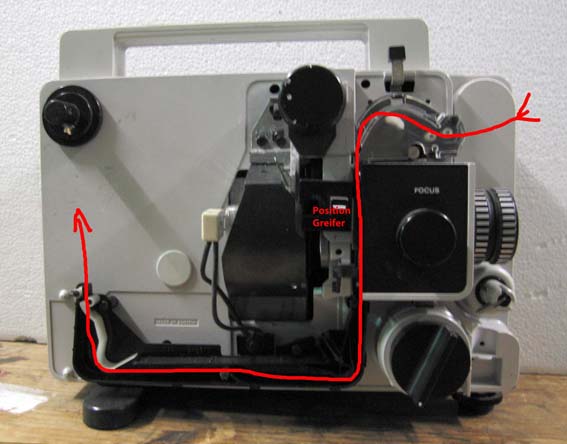
The Eumig 614D using the claw for film transport only.
Concerns Eumig Mark 604, Eumig 614 D, Eumig 624 D and equivalent models (some also by Bolex: Bolex SL 8)
Projectors ideal for looping:
When the film is placed on Looper 8 at first, it is usually wound more tightly than after a few rounds of looping. After some loops a tension equilibrium sets in (this is the same for loopers of all types and film sizes). If you load Looper 8 with a lot of film, some projectors are not strong enough to transport the film flawlessly at the beginning. You can hear the claw loosing grip now and then and the film is not evenly moved. This puts a lot of strain on the perf holes. For the use with Looper 8 projectors are recommended which have a transport sprocket wheel before and after the film channel (like the Bauer T610 in the image below). This takes the tension off the transport claw. Only with that kind of projectors the full capacity of Looper 8 can be used.
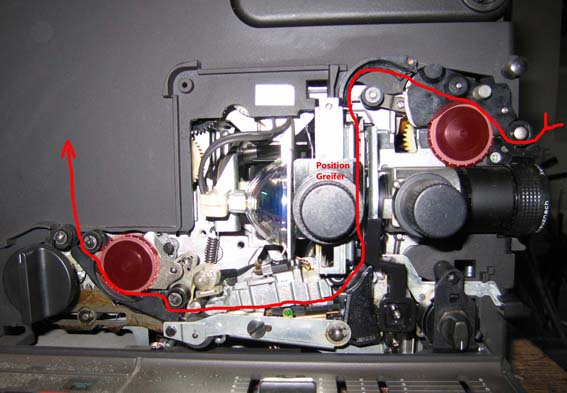
Bauer T610 with transport sprocket wheels before and after the gate.
Recommended Models:
The big Bauer series: Bauer T610, Bauer T600, Bauer T525, Bauer T520, Bauer T510, Bauer T502, Bauer T500, Bauer T50, Bauer T60
The big Sankyo series: Sankyo Stereo 800, Sankyo Sound 702, Sankyo Sound 700, Sankyo Sound 502, Sankyo Sound 301
The big Eumig series: Eumig S940, Eumig 820, Eumig Mark M models, Eumig Mark S models
There’s many more which will do the job.
A possible workaround for weak projectors:
A workaround is to first use the looper with the film you want to project on a bigger machine and let it turn a few rounds until the equlibrium has settled and then place it over to the smaller projector. Like this you help the film loop to get to the equilibrium. I have not tested this thoroughly enough that I could tell you which is the max. loop length that can be achieved with this technique with the small Eumig series for instance. It probably is different for different models.
Using the magnetic sound track to play loops with sound:
Using the magnetic sound track for sound in loop projections is not recommended at all. As the sound head is in touch with the track when playing sound it will lead to abrasion of the sound head and the sound track on the film. This does not matter much if a film is played once in a while, but in a loop it is played over and over again. The ground off magnetic track spreads in the projector as brown powder. Not good!!
Optical sound is very rare in Super8 projectors and I would not know a lab that could still produce an optical soundtrack on Super8. This service is also becoming scarce for 16mm!
Dealing with odd projector handles:
The Eumig S940 has a T-shaped pull-out handle. Such handles are not rigid enough for the Looper 8 brackets. With a simple trick the brackets can be used anyway, helping to fix the looper rock steady. In the images below you can see that I have added a piece of wood which helps the brackets not to contract on the lower half (where the handle is shallow). The dimensions of the piece should be 60mm x 27mm x 20mm in the case of the Eumig S940. It is important that the width is similar to the width of the projector handle (width 28mm). It can be slightly smaller but not wider! The length should not exceed 60mm as it would obstruct the front screw. It is important to pull the handle out completely before placing the piece of wood and then fixing the screws.
Wood insert to stabilize the brackets.
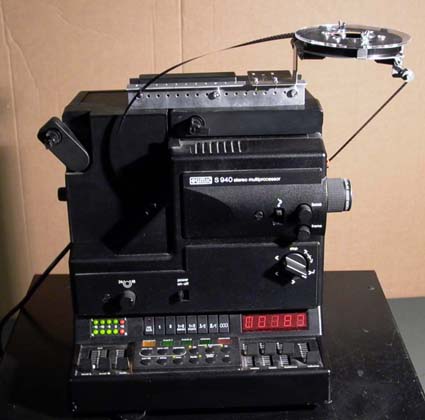
Looper 8 on an Eumig S940
Using the antistatic brush:
The antistatic brush has two purposes:
1) It is a soft brush which removes dust from the film
2) At the same time it removes the static electricity from the film.
Static electricity is an electric charge which bulids up on surfaces of electrically non conducting materials (like plastic) when they rub eachother. The electric charge makes dust particles stick to the charged object. The antistatic brush is an electrical conductor which removes the electric charge. Therefore it is important to attach the brush to a grounded metal part of the looper or the projector. The soft brush should touch the film but not use much force on it.
The use of the antistatic brush it not imperative.
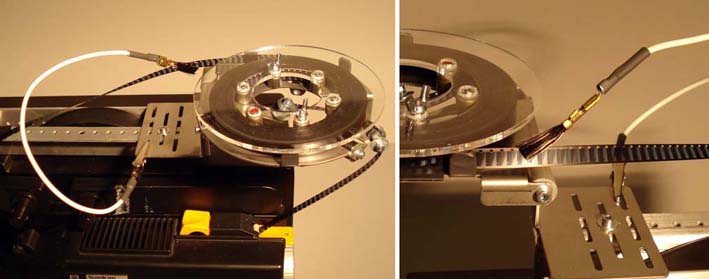
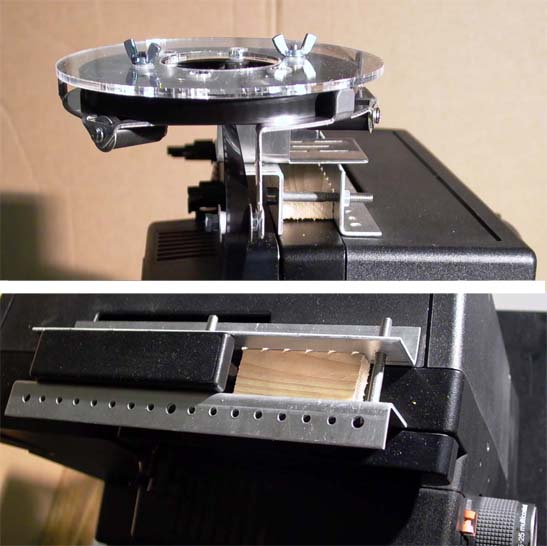
The antistatic brush installed
The „Back Loop“:
The amount of film which lies between the exit of the projector and the entry of Looper 8 can vary. I will call it „back loop“ here. This back loop should not be too long as the film will hang down and become entangled with itself, parts of the projector or any other object nearby. The back loop should also not be too short as any tension building up in the loop should be avoided and the film might rub on parts of the projector or Looper 8. When installing the film loop it is not always easy to judge how long the back loop will be in the end, as it changes length until the whole loops equilibrium is reached. If too long, the film splice needs to be opened and the amount of film should be shortened by winding it one more time around the film spooled up or by cutting a piece out (if applicable). If too short by much the splice must be opened and the film unwound until there is enough film to build a nice back loop. If too short by a bit, the back loop can also be stabilized in length with the use of a pipe cleaner as shown in the pictures.

„Back Loop“ of a good length.
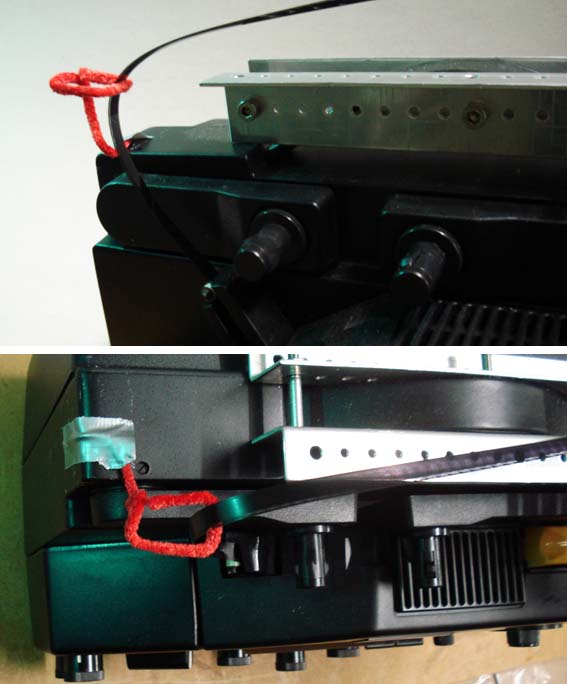
Pipe cleaner helping to stabilize the „Back Loop“